Building a Drag'n Drop Dart Game with JavaScript
Interact.js -> a draggable JS library
My 3 year old daughter loves playing games on the iPad. She also loves to swipe through pictures and interact with the screen.
As a father, I thought that was cute. She's enjoying herself.
As a software developer, I thought it was cool. She's already starting to enjoy what other software developers can do. Then it hit me.
Why haven't I made a game for my daughter?
I have a Master's degree in education and have 10+ years of teaching experience. I know child development, and here I was, a freshly minted software developer NOT making a game for my daughter.
So, I decided to change that
I know enough JavaScript to feel comfortable using the DOM, building out basic React applications, and solving problems that beginners may find difficult. But, I had never really come across a library that specialized in dragging and dropping. When I studied Swift programming, it was a necessity since everything is meant to be touched and played with on the screen. Games are how you learn to build. But for JavaScript, it's not something that has been discussed in the #100Devs bootcamp and not something that I've come across while researching and reading.
So, I started to search for myself. Turns out, there are a lot of libraries that are made for dragging and dropping. There are even some Vanilla JS ways to do it. But as I started to dive in, I realized that most were build for eCommerce website. Shopping carts, item switching, that kinda stuff. I didn't really find anything for games. Then I came across Interact.js. And I loved it.
I'll walk you through my process and hopefully by the end, you can have a functional dart-board when you're done. That's right, we're throwing darts baby!

I chose Interact.js as my draggable library. The reason was it's accessibility, documentation, and mini-tutorials seemed very easy.
1. npm install interact.js **
To start, navigate to the directory that you're using to build this sweet mini-game, and install interact.js. If you've already got npm on your computer, then all you have to do is npm install interact.js in the terminal and then let it do it's magic. A few seconds later you should be ready to move on.
** I'm still kinda new to npm, but this worked for me. There is also a CDN script that you'll have to use. I read that you don't need to do both, but I had to both install interact.js AND use the script.
2. Create your index.html main.js style.css files
Nothing advanced about this. You're going to create a webpage with some html elements, style, and js. So you'll have to create all of those. Once that's completed, then navigate your way to get the CDN.
3. Add the CDN script to your index.html
After you have the big three set up, you'll need to add the CDN script provided by interact.js. Here's the link. Copy the first one, and then paste that into your <head> in the index.html file. While you're at it, might as well link up your style.css too. It should look like this.
<head>
        <link rel="stylesheet" href="style.css">
        <script src="https://cdn.jsdelivr.net/npm/interactjs/dist/interact.min.js"></script>
        <title>My Dart Game</title>
 </head>
Alright, now that we have that done. Let's move into the body of the index.html file and start setting some things up. This is what I have.
<body>
    <h1>BULL'S EYE!</h1>

    <div id="dropzone" class="dropzone"></div>

    <div id="dart" class="draggable drag-drop">
        <img src="dart.png" />
    </div>

    <script src="main.js"></script>
</body>
The h1 BULL'S EYE is just for fun, but you can add it to add a bit of fun to the project. What you should focus on is the divs. You'll also have to download some png's of a dart and dartboard. I trust you can find those online.
div 1 id="dropzone"
This is the dropzone with an id and class of dropzone. We'll be using that dropzone class later. The background image of this will be a dartboard, but that's in the CSS file.
div 2 id="dart"
This is the dart. Make sure to add the id dart, the class draggable, and another class drag-drop. We'll be coming back to all of these in the JS file. So make sure it's all there. I chose a dart because, ya know, we're throwing darts! You can add whatever you'd like.
add your main.js script
Super important. Add it here so you can manipulate the elements with your script.
3. Now, for a little style.css
Feel free to add whatever you like to this. You can change other elements, but you should copy this part line for line (for the most part). I left out body and h1 elements, so go to town with those style away!
.draggable {
    position: absolute;
    bottom: 15px;
    right: 50px;
}
.draggable img {
    width: 50px;
}
.dropzone {
    background-image: url('dart_board.png');
    background-size: cover;
    background-repeat: no-repeat;
    border-radius: 50%;
    width: 120px;
    height: 120px;
    border: 4px dashed transparent;
    margin: 25px;
}
.drop-active {
    animation: flash 0.2s infinite;
}
@keyframes flash {
    0%, 100% {border-color: green;}
    50% {border-color: red}
}
key takeaways
- The
.draggableis the dartdiv. I positioned it at the bottom right. .draggable imgis the dart img. Google search.- The
.dropzoneis the dartboard. Again, Google is your friend. .drop-activehelps us see WHERE we will be dropping the dart- I added keyframes for a little pizzazz
4. Now, what's this interact.js all about?
Well, to be honest, I can't tell you a lot about what's going on under the hood, but I can walk you through what's happening out here in the main.js.
First, add this snippet to set the position of the dart's x-position and y-position to 0. We'll need to move the dart later.
const position = { x: 0, y: 0 }

// target elements with the "draggable" class
interact('.draggable')
  .draggable({
    listeners: {
      // call this function on every dragmove event
      move: dragMoveListener,
    }
  })
And then add this.
function dragMoveListener (event) {
  let target = event.target
  // keep the dragged position in the data-x/data-y attributes
  let x = (parseFloat(target.getAttribute('data-x')) || 0) + event.dx
  let y = (parseFloat(target.getAttribute('data-y')) || 0) + event.dy

  // translate the element
  target.style.transform = 'translate(' + x + 'px, ' + y + 'px)'

  // update the posiion attributes
  target.setAttribute('data-x', x)
  target.setAttribute('data-y', y)
}
Most of this is straight from the interact.js website and they do a very good job at commenting.
Basically you're going to be able to interact with a .draggable element and that element will be using the dragMoveListener function. These are already written for you. I cleaned them up to eliminate anything we don't need. But it's basically taking a target (ie. the dart) and while you move it, you are resetting the target.setAttribute of the x-coordinate and the y-coordinate. Simple geometry really.
Now, test out your code!!
You should have a dart that you can drag around. Have fun with that! When you're done playing, come on back.
... ... ...
That was cool, right? Now, if you haven't really followed along, please go back to make sure you get that. The next part all goes in together with 3 separate functions. It's a big chunk of code, but I broke it down to explain a little bit, and then patched it back together at the end.
5. Let's interact with that .dropzone
part 1
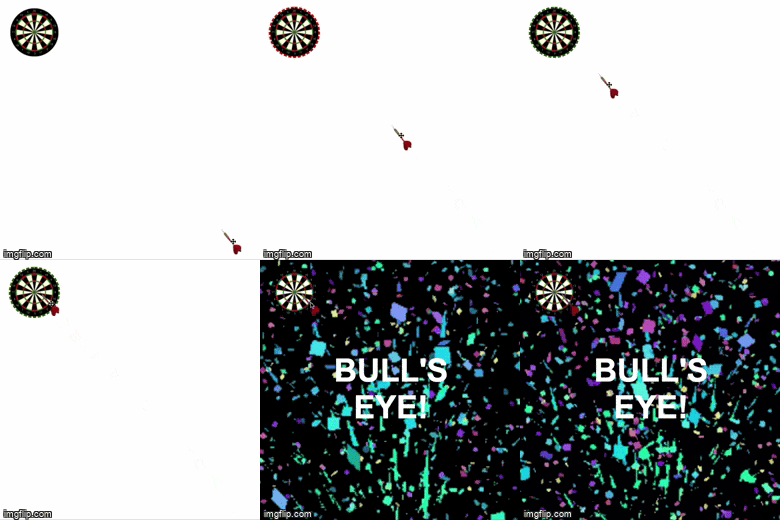
Initiate the .dropzone interaction. You will be able to accept the #dart as an interaction and it must overlap: 0.85 or 85% to be successful.
interact('.dropzone').dropzone({
  // only accept elements matching this CSS selector
  accept: '#dart',
  // Require a 85% element overlap for a drop to be possible
  overlap: 0.85,

// to be continued
part 2
Now, we'll have to add the drop-active class to the dartboard. This will show us visibly WHERE we can set the dart down.
// listen for drop related events:
  ondropactivate: function (event) {
    // add active dropzone feedback
    event.target.classList.add('drop-active')
  },

// to be continued
part 3
We know where to drop it, but what's going to happen after we drop it?!?! I'll be changing the h1 style so we can see BULL'S EYE and also, I'll add in a confetti.gif background for even more glamour.
ondrop: function (event) {
    // change the background color
    document.querySelector('h1').style.visibility = 'visible';
    document.querySelector('body').style.backgroundImage = `url('confetti.gif')`
  },

// to be continued
part 4
And finally, remove the blinking drop-active class from the dartboard.
  ondropdeactivate: function (event) {
    // remove active dropzone feedback
    event.target.classList.remove('drop-active')
  }
})
Here are Parts 1 - 4 all together
Hopefully it makes more sense now broken up into 3 separate functions and an 'initiator'.
interact('.dropzone').dropzone({
  // only accept elements matching this CSS selector
  accept: '#dart',
  // Require a 85% element overlap for a drop to be possible
  overlap: 0.85,

  // listen for drop related events:
  ondropactivate: function (event) {
    // add active dropzone feedback
    event.target.classList.add('drop-active')
  },
  ondrop: function (event) {
    // change the background color
    document.querySelector('h1').style.visibility = 'visible';
    document.querySelector('body').style.backgroundImage = `url('confetti.gif')`;
  },

  ondropdeactivate: function (event) {
    // remove active dropzone feedback
    event.target.classList.remove('drop-active')
  }
})
Congratulations!
That's it, you should now have a working dart-board game. Play around with it. See what you can add and modify!
Want to do more? Simple (but not really!) See if you can do any of these :)
- add more darts
- add a score card
- only show the bull's eye if it really is a bull's eye!
Good luck!
That's it for now. If you liked what you read, please follow me on Twitter, connect with me on LinkedIn or follow me here on Hashnode.

